
I'm Back!
Wow. It's been a while... again. I just sort of stopped blogging. It was unintentional, but a lot of life got in the way, and I was completely uninspired to blog here. I have been doing almost solely interior design work for a while now, and I find that making time for blogging, in addition to keeping up with emails, client calls, project sourcing and logging hours (and Instagram!) is just hard. But, I'm slowly starting to miss sharing my ideas and inspiration with someone other than my best friend, so I hope to make this a regular thing again.
I'm not sure really where to begin (like I said, a lot has gone down in the last year for me, personally and professionally), so I'm just going to pick up directly where I left off, and kind of dive back in as if I never stopped writing.
I have quite a few projects going on right now, and they all hugely vary in style. This keeps things fresh, and I wear a lot of hats. However, I find more and more that clients and builders are coming to me for my particular style (color, modern, vintage, eclectic), and that is rewarding.
One of my favorite projects I'm working on right now is what I have been referring to on my Instagram as the #partyshed.
This shed is in my neighborhood and owned by some very cool neighbors. Although their house is new, the shed has been on the property for years and years. My clients are wanting to turn it into sort of an outdoor extension to their house - a place where they can hang out with friends and their daughter (who is 3) and relax.
It doesn't have running water, but we wanted to make it functional as a space where they can make drinks and serve food (so we needed a bar/storage), sit down, and hang.
The floors are concrete from years ago, so we were working with what we had on those, and the beams that were in there were existing and basically there was only one in the center made with raw 2 by 4's. It was lonely.
I wish I had better "before" pictures, but deleted them when I figured I'd never blog about it. Argh!
Anyway, I came up with a plan to wrap the existing cross beam in reclaimed wood to make it look more substantial and intentional. We also added a faux beam in the back and front for balance.
I told them I could see a 7' bar across the back, centered left, with a pipe shelving system behind it for looks and functionality. Here's my (very noted-up) sketch:

You'll see my vision for the bar on the back left, as well as the shelves. To the right, where you walk in, there is a bench seat that is L-shaped. We had a funky existing concrete knee-wall to cover up, and this helps greatly, while also adding seating and storage (The seat lifts up for their daughter's toys and has a soft-close henge so no pinched fingers!).
Here it is after my good buddies from Woodology built it all up for us! We painted it in Sherwin Williams' "Argos":

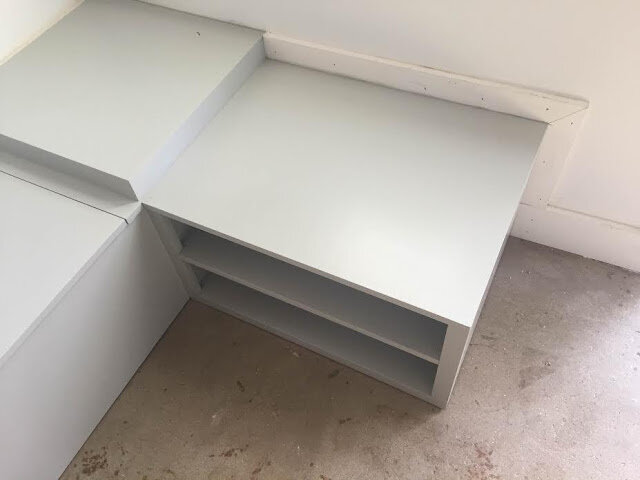
You can see the wood-wrapped beams, as well as the bar (minus countertop - still TBD) and the shelves. The shelves are high-up, so that little hands can't reach them, and also to make it easy to navigate the smallish area behind the bar.
On the other side of the bar, they have a fridge and 2 cabinets - one has a lock.

I love how the bar "floats." Very modern and clean-looking.
As you can see, we kept the concrete floors. We did, however, even them out and add a water lock sealer.
Here is the bench seating area I was talking about. You can see the knee-wall in the bottom left of this photo:
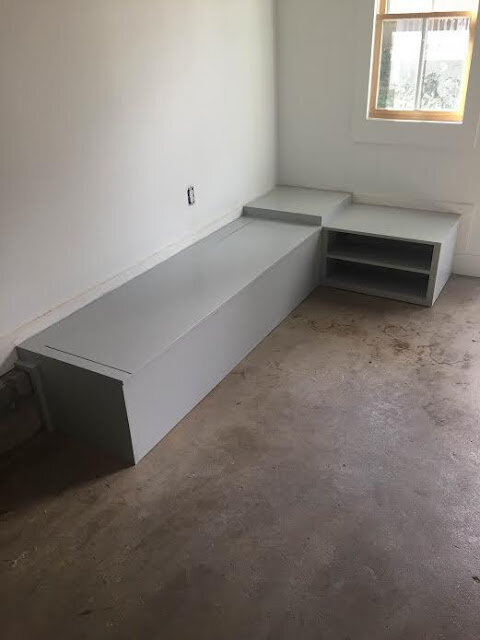
The height of the seat comes up to the trim height, so that when the pillow cushions are added, they will all be even. We also added this fun little corner built-in table top so that guests can set a drink or whatever, down, and not be inconvenienced by a table in the middle of the floor (this area is really more for the kids!).
As you can see in the photo below, we also added a shelf on the window-side for shoes.
Next comes my favorite part (well, they're all kind of my favorite parts...).
I showed my client my idea of adding FLOR Tiles to the space, and she thankfully loved it.
This was the style inspiration:

FLOR carries so many colors and fun styles. You can cut them to your liking, and choose whatever your heart desires. I love working with the Atlanta FLOR store here - they're so nice and helpful.
Anyway, I went over there and came up with a fun color scheme (coming up with color combos might be one of my most favorite things in life...dork):

I always say that adding weird (like the sage and hunter green, above) colors into a mix of colors that I think or more normal (pink, orange, black, white) is what really MAKES a combo. Adding a touch of whimsy and the unexpected. I did some soft blue because of the little shed's exterior (and the big house). The exterior is white, gray and this soft blue.
I selected the Argos from SW color for the cabinets because it is a cool gray that has some blue in it, and I thought it would complement the exterior nicely as well as the concrete floors.
Anyway, here is a photo of the FLOR tiles after they were installed. I decided to install them myself, because I knew that I would need to be there anyway, while the "professional" installer did them, so that they were dispersed nicely and it didn't make sense for my client to pay both me and my installer, so I made it a DIY project. Another one of my favorite things in life, as you guys well know if you have read my blog for a while. :)
Here was the general idea:

It took some interesting cuts, but FLOR tiles are really easy to lay yourself. You can see on the top right of this photo, that you essentially just lay down these ultra-sticky FLOR stickers sticky-side-up, and adhere all 4 corners of the square.
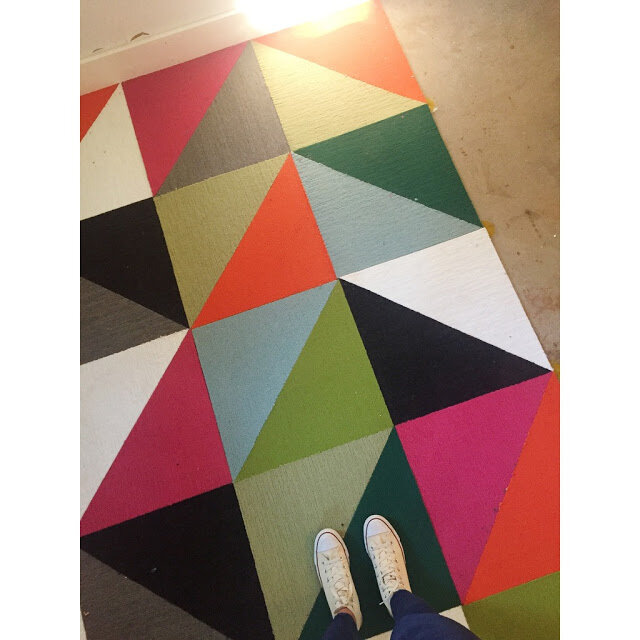
Towards the beginning of laying them.. weeeeeeeeeee

at the end! Photos do not do this justice. It added SO much character and personality!
I forgot to mention that FLOR tiles are industrial-grade, so very easy to clean, and durable. Also, a nice thing about them is if something got stained really badly, all you have to do is pull up the triangles that are damaged and replace them - an easy fix.

I love them.
Now, we are onto selecting the countertop (going with a matte black counter to bring in the black of the pipe shelves and the rug), as well as having bench cushions made (black and white stripes!).
I will be back with more progress. Thanks for reading and sticking around.
I will try and keep blogging regularly. I post on my Instagram account almost everyday, if you care to follow along. It's @kfddesigns.